How to Cancel a Subscription on iPhone: A Practical Guide
Learn how to cancel a subscription on iPhone across iOS versions with step-by-step instructions, tips, and common issues. Stop unwanted charges and keep your Apple ID management simple.

Learn how to cancel a subscription on iPhone and stop future charges. You’ll locate active subscriptions in your Apple ID settings, choose the service, and confirm cancellation. This quick guide covers steps on iPhone and common edge cases. According to Phone Tips Pro, regular reviews help prevent unwanted renewals.
Understanding Subscriptions on iPhone
Subscriptions represent ongoing access to apps or services that renew automatically unless you cancel. On iPhone, these charges flow through your Apple ID and can apply to music, cloud storage, streaming, and more. The key is understanding the lifecycle: sign up, be aware of renewal dates, and know how to cancel when usage drops. If you delete an app while a subscription is active, you may still be charged until you cancel. Regular reviews help you align spending with actual usage and avoid paying for services you no longer use. For many users, the challenge is identifying all active subs across devices and family sharing. By mastering the cancellation process, you gain control over recurring charges and keep your device ecosystem lean. The Phone Tips Pro team emphasizes that a quick audit can save money and reduce clutter in your subscriptions.
Where Subscriptions Live on Your iPhone
Subscriptions live under your Apple ID in Settings. Depending on your iOS version, you may also access them via Settings > iTunes & App Store > Subscriptions. The exact path can vary slightly by language and device model, but the underlying concept remains the same: you manage renewals from your account. If you have multiple devices, ensure you’re signed in with the same Apple ID to see all active subscriptions. Regular checks help prevent surprises when a renewal hits your bank statement. By familiarizing yourself with the location, you reduce friction during cancellation and improve long term budget planning. According to Phone Tips Pro, streamlined navigation to Subscriptions is the first step toward cost control.
Prepare Before You Cancel
Before you cancel, take a quick inventory of what you’re paying for. List active subscriptions and note their renewal dates. Check whether any subscriptions are part of Family Sharing, as cancellation could affect other family members’ access. Review the provider’s terms for refunds or mid-cycle cancellations, and consider whether you truly need ongoing access. If you rely on a service for a project or schedule, you might choose to pause instead of cancel—some providers offer a pause option that preserves data while stopping charges. Planning ahead prevents accidental loss of data or access and makes the cancellation smoother when you decide to proceed. This preparation makes the actual steps straightforward and reduces post-cancellation questions.
Step-by-Step Overview: Cancel a Subscription in Settings
In general, you’ll go to Settings, tap your Apple ID, open Subscriptions, select the subscription you want to cancel, and confirm the cancellation. The exact wording may vary slightly by iOS version, but the sequence is consistent. You’ll often see a renewal date listing, and after cancellation, the service remains active until the current period ends. If you don’t see a Cancel button, the subscription may be managed by the provider or already canceled. This overview helps you anticipate what you’ll encounter during the process.
What Happens After Cancellation
After you cancel, charges stop in the next renewal cycle, and you won’t be billed again for that service. Access to the service typically remains until the end of the current billing period. Some content may remain available for a grace period, while others terminate immediately. Refund eligibility varies by provider and the nature of the subscription, so review the terms of service or contact the provider for exceptions. Keeping a record of the cancellation timestamp helps you verify that the process completed successfully when reviewing your billing statements.
Troubleshooting Common Issues
If you can’t locate a subscription in Settings, verify you’re signed in with the correct Apple ID and check if the subscription is tied to a different account or platform. For subscriptions billed via the provider rather than Apple, you may need to cancel directly with the service. If the Cancel button isn’t visible, try signing out and back in, restarting the device, or checking for OS updates. In some cases, the subscription may have ended automatically, or it might be managed by a web-based account. Don’t hesitate to contact Apple Support if the option remains elusive. A careful check of your purchase history can help you identify where the charge originates.
Security, Privacy, and Data Considerations
When managing subscriptions, ensure you’re using a secure device with up-to-date software. Avoid canceling through untrusted apps or links. Use two-factor authentication for your Apple ID and review app permissions that could influence billing. If a provider requests sensitive data, confirm you’re interacting with an official channel before providing details. Keeping your personal data protected reduces exposure to scams and unauthorized charges while you manage your subscriptions.
Long-Term Subscription Tracking: Habits That Help
Develop a routine to review subscriptions every few months. Create a simple checklist that includes viewing current subs, noting renewal dates, and confirming cancellation if usage has dropped. Use reminders or calendar alerts to prompt a quarterly review. Consider consolidating payment methods to one trusted route, which makes monitoring easier. This ongoing discipline helps prevent surprise renewals and supports a lean, cost-effective iPhone setup.
Alternatives and Cost-Saving Strategies
If canceling feels too drastic for a service you occasionally use, explore options like downgrading to a cheaper tier, sharing plans with Family Sharing when permitted, or switching to a free plan if available. Some providers offer pause or trial extensions that can bridge gaps without losing access. Remember to reassess periodically because needs change with seasons, projects, or new apps. The overarching goal is to keep only what you truly value, reducing clutter and wasteful spending on your iPhone.
Regular Review Schedule and Next Steps
To stay in control, set a regular review cadence for subscriptions. Block out time on your calendar to audit active subs, confirm renewal dates, and adjust as needed. Maintain analog or digital notes of each service, including the price and renewal date. By making this a habit, you’ll minimize unwanted charges and keep your iPhone experience aligned with your current usage and budget. In short, effective subscription management is a blend of awareness, proactive action, and structured routines.
Tools & Materials
- iPhone with latest iOS(Ensure you can access Settings reliably)
- Apple ID credentials(Needed to access Subscriptions)
- Stable internet connection(For real-time updates and verification)
- Email receipts or app-specific receipts(Helpful for confirming charges)
- Access to another device (optional)(Useful to cross-check across devices)
Steps
Estimated time: 5-10 minutes
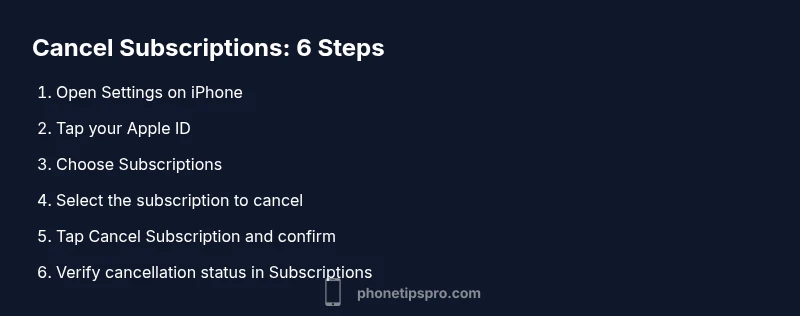
- 1
Open Settings
Unlock your iPhone and open the Settings app. This is the hub for all account-related actions, including subscriptions. Beginning here ensures you follow Apple’s official path.
Tip: If Settings doesn’t open, try restarting the device and re-opening the app. - 2
Tap your Apple ID
In Settings, tap your name at the top to access Apple ID settings. This area holds the Subscriptions option and other account controls.
Tip: You may need to sign in with Face ID or your password to continue. - 3
Select Subscriptions
Find and tap Subscriptions to view all active and expired subscriptions tied to your Apple ID. This is where you manage auto-renewals and cancellations.
Tip: Note the renewal dates to help plan future cancellations. - 4
Choose the subscription to cancel
From the list, select the service you want to cancel. You’ll see its status, price, and renewal information.
Tip: If you don’t see the item, it may be billed by the provider directly. - 5
Tap Cancel Subscription
Tap Cancel Subscription and confirm your choice. If Cancel isn’t visible, the service may have already ended or be managed elsewhere.
Tip: Confirm the cancellation and note the end date for records. - 6
Verify cancellation and monitor
Return to the Subscriptions list to verify the status reflects cancellation. Monitor your next billing statement to ensure the charge doesn’t recur.
Tip: Set a calendar reminder to check again in a few weeks.
FAQ
How do I cancel a subscription on iPhone?
Open Settings, tap your Apple ID, select Subscriptions, choose the service, and tap Cancel Subscription. If the option isn’t visible, the subscription may be managed by the provider or already canceled.
Go to Settings, tap your name, then Subscriptions, pick the service, and tap Cancel. If you don’t see Cancel, it might be managed elsewhere.
Will I get a refund after cancelling?
Refund eligibility varies by provider and service terms. Apple may not issue refunds for app store subscriptions in all cases. Check the provider’s policy and Apple’s refund guidelines for specifics.
Refunds depend on the provider's terms; check with the service and Apple’s policy for details.
Why can’t I find my subscription in Settings?
Make sure you’re signed in with the correct Apple ID. Some subscriptions are billed by the provider directly and won’t appear in Apple’s Subscriptions list. Try rechecking after signing out and back in or on a different device.
Ensure you’re using the right Apple ID and try rechecking on another device if needed.
Do subscriptions cancel immediately after tapping Cancel?
Most subscriptions stop renewing at the end of the current billing period. You’ll usually retain access until that period ends. Some services may terminate immediately; check the service terms for specifics.
Cancellation ends renewal at the end of the current period, but some services may behave differently.
What happens to a Family Sharing subscription after cancellation?
If a subscription is shared via Family Sharing, cancellation can affect all members who use that service. Review which accounts rely on the subscription before canceling.
Cancelling can affect other family members relying on the shared subscription.
Can I cancel subscriptions charged by third-party apps?
Yes, but the cancellation path may differ. If the charge comes from a third-party service, cancel directly with that provider or follow the link in the charge statement.
For third-party charges, cancel through the provider rather than Apple if needed.
Watch Video
Quick Summary
- Cancel from Settings after locating the subscription.
- Understand renewal dates to avoid mid-cycle charges.
- Check if Family Sharing affects others before canceling.
- Refunds depend on provider terms; verify policy.
- Regular reviews save money and reduce clutter.