How to Update iPhone Software: Step-by-Step Guide
Learn how to safely update iPhone software, back up data, free up storage, and troubleshoot common update issues with expert guidance from Phone Tips Pro.

You can update iPhone software over the air through Settings or via a computer, but preparation matters. Ensure a stable Wi‑Fi connection, a fully charged battery, and a recent backup. This guide walks you through the exact steps to update safely, verify the install, and handle common problems. You'll learn how to manage storage, confirm the update, and what to do if something goes wrong.
Why Update Your iPhone Software Matters
If you’ve ever asked how do i update software on my iphone, the answer is simple: regular updates improve security, fix bugs, and unlock new features. Apple’s software updates patch vulnerabilities that criminals exploit, protect personal data, and optimize performance on aging devices. Updates also ensure compatibility with new apps and services. While each release varies, most iPhone models benefit from staying current with the latest public build. In 2026, Apple typically ships major iOS updates annually and minor patches throughout the year. Keeping your iPhone up to date can extend its usable life and reduce crashes, giving you a smoother experience day-to-day. This is especially important for devices that handle sensitive information like photos, messages, and financial apps.
In practical terms, regular updates minimize compatibility issues with new apps and services you use daily. They also help keep your device running smoothly by addressing performance bottlenecks and memory management improvements that Apple introduces with newer builds.
How Updates Improve Security, Performance, and Features
Security updates close holes that could let attackers access personal data, while performance improvements can make apps feel snappier and reduce unexpected slowdowns. Updates often bring new features such as more transparent privacy controls, improved camera processing, and better integration with other Apple devices. On iPhone models from the last few years, these benefits are noticeable in daily tasks like browsing, messaging, and gaming. In 2026, the cadence of updates means most users will coincide with at least one major release and a handful of smaller patches.
By keeping software current, you also ensure better compatibility with the latest versions of apps you rely on. This can reduce crashes and app-specific bugs that can arise when apps are not optimized for older iOS builds.
Prerequisites: Check Your Device Before You Update
Before updating, confirm you have a recent backup, enough free storage, and a stable power source. Check your battery level and connect to a charger if possible. If you plan to update over Wi‑Fi, ensure the network is reliable and not prone to interruptions. Review the update notes for any device-specific caveats, such as feature changes that might affect accessibility settings or custom configurations. As of 2026, Apple’s update notes also highlight privacy improvements and app compatibility considerations you should review.
Additionally, consider temporarily disabling Low Power Mode and closing large background apps to speed up the process and reduce the chance of update interruption.
Over-the-Air (OTA) Update: What Happens and How to Do It
OTA updates are downloaded directly on your iPhone and installed without a computer. The device will download the update, prepare the installation, and reboot to finalize the process. You’ll typically see a progress bar and a recap page after the update completes. It’s important to stay connected to power and Wi‑Fi during the entire process to avoid mid-update failures. After installation, you may be prompted to sign back into apps or re-enter your passcode for security.
Update via Computer: macOS Finder or Windows iTunes
If you prefer updating through a computer, connect your iPhone to a Mac or Windows PC and use Finder (macOS Catalina and later) or iTunes (Windows or older macOS). In Finder/iTunes, select your device, then choose “Check for Update” and follow on-screen prompts. This method can be more reliable on slow networks or for larger updates, as it leverages a stable connection and can resume if interrupted. After the update finishes, safely eject your iPhone and disconnect.
Troubleshooting Common Update Issues
If the update stalls, you have a few reliable options: reboot the device, retry the update, or free up additional storage. Error codes like 14 or 4013 often indicate connectivity or storage problems. For OTA failures, try a fresh reboot, ensure the device has sufficient space, and reconnect to a stable Wi‑Fi network. If updates fail consistently, performing a full backup and restoring from a fresh install via computer can resolve deeper software conflicts.
Verify the Update and Post-Install Checks
After updating, confirm the install by checking Settings > General > About for the current iOS version. Open a few essential apps and test features like Face ID, notifications, and app updates. Ensure your data is intact by reviewing photos, messages, and notes. If you enabled any beta profiles or developer options, revert to a stable release if recommended in the update notes. Finally, re-enable any preferences you turned off for the update and re-check storage usage.
After the Update: Quick Follow-Ups and Best Practices
As a best practice, update apps from the App Store after the iOS update to ensure compatibility. Consider enabling automatic backups for future updates so your data remains protected. Periodically review storage usage and remove unused apps or large media files to keep room for future updates. By following these steps, you minimize risk and maximize the benefits of the latest iPhone software.
Tools & Materials
- iPhone(Ensure battery is at least 50% or keep the device plugged in during the update)
- Stable Wi‑Fi connection(A reliable network prevents corrupted downloads)
- Charger and cable(Keep the device plugged in throughout the process)
- Computer with Finder or iTunes (optional)(Use if updating via computer; macOS Catalina+ uses Finder)
- Recent backup (iCloud or computer)(Back up before updating to prevent data loss)
- Sufficient storage space(Free space is often required for the update package)
Steps
Estimated time: 30-60 minutes
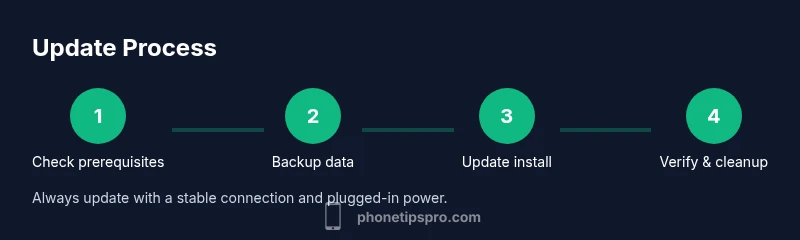
- 1
Check prerequisites
Review battery level, storage, and backup availability. Confirm you have a stable internet connection and access to your Apple ID.
Tip: If storage is tight, free up space before starting. - 2
Back up your iPhone
Create a full backup to iCloud or a computer. This protects your data if something goes wrong during the update.
Tip: Verify the backup is complete before proceeding. - 3
Choose OTA or computer method
Decide whether to update over the air in Settings or via Finder/iTunes on a computer depending on network stability and storage.
Tip: OTA is simpler; computer updates can be more reliable on large updates. - 4
Install the update (OTA)
Go to Settings > General > Software Update, download the update, and install. The device will reboot automatically.
Tip: Do not interrupt the process; keep the device plugged in. - 5
Install the update (computer)
Connect the iPhone to your computer, open Finder or iTunes, select the device, and choose Update. Follow prompts to complete the install.
Tip: If the download stalls, pause and resume or try a different network. - 6
Verify the installation
After reboot, check Settings > General > About for the new iOS version and test core apps.
Tip: Run essential apps to confirm stability before resuming daily use. - 7
Post-update cleanup
Review storage, update apps, and re-enable any disabled features. Consider enabling automatic backups for future updates.
Tip: Keep the device charged and connected for a few extra minutes after updates finalize.
FAQ
How long does an iPhone software update take?
Update times vary by device and update size, but most users experience 20-40 minutes of process time with a stable connection and powered device.
Most updates take about twenty to forty minutes with a reliable connection and a powered device.
Should I back up before updating?
Yes. Backing up protects your data if anything goes wrong during the update process. You can back up to iCloud or a computer.
Absolutely—back up to iCloud or your computer before starting.
Can I update without Wi-Fi?
OTA updates require a stable internet connection, typically Wi‑Fi. If you must use mobile data, ensure you have an unlimited plan and keep in mind data usage.
OTA updates usually need Wi‑Fi; if you must use cellular data, monitor usage and connection stability.
What if the update fails to install?
If an update fails, reboot the device, retry the update, or attempt via a computer. If problems persist, restore from a backup and try again.
If it fails, reboot, retry, or try on a computer; restore from backup if needed.
Will updating erase data?
A standard update should not erase data. Backups protect you in case something unexpected occurs during the process.
Updates don’t usually erase data, but backups guard against any risk.
How can I free up space for an update?
Review large apps, photos, and videos. Offload unused apps and delete unnecessary media to create space for the update.
Delete or offload large files and apps to free up space before updating.
Should I update apps after the iOS update?
Yes. After updating iOS, open the App Store and update all apps to ensure compatibility with the new system.
Yes—update apps to ensure compatibility with the new iPhone software.
Watch Video
Quick Summary
- Back up before updating
- Check storage and power
- Choose OTA or computer method
- Verify update after install