How to Check If Your iPhone Is Genuine
Learn reliable steps to verify iPhone authenticity, including serial/IMEI checks, activation status, and official warranty verification. Quick, practical guidance from Phone Tips Pro for iPhone users in 2026.

To check if your iPhone is genuine, verify its serial and IMEI with Apple, inspect packaging and hardware, and confirm activation and warranty details using official tools. Start by locating the device identifiers in Settings, compare them to the packaging, and consult Apple’s support pages or Check Coverage to verify legitimacy. If anything looks off, seek professional assessment.
Why authenticity matters
In a market with gray-market devices and counterfeit models, ensuring your iPhone is genuine protects your data, guarantees access to official support, and keeps your warranty intact. A fake or tampered device may lack proper security updates, misreport hardware capabilities, or fail to work with official services like Apple Pay or iCloud. According to Phone Tips Pro Analysis, 2026, consumers who verify key identifiers before purchase experience fewer post-purchase surprises and security concerns. This guide walks you through practical checks you can perform with a typical iPhone and a few trusted tools to establish authenticity without needing specialized equipment.
- Protect your data and privacy by avoiding unknown software configurations.
- Preserve your warranty and eligibility for repairs through official channels.
- Reduce the risk of activating a stolen or counterfeit device.
The goal is to give you a clear, actionable checklist you can follow in minutes, whether you’re shopping used or validating a device you already own.
Quick at-a-glance signals of a genuine iPhone
Many red flags show up immediately upon inspection and basic settings checks. Genuine iPhones typically have a clean glass panel with precise alignments, a high-quality Apple logo, and consistent haptic feedback. Packaging usually includes the model name, serial number, and an official Apple logo; counterfeit boxes often miss correct typography, tampered barcodes, or mismatched model numbers. Inside the box, accessories should be genuine Apple components with proper fit and finish. In addition, the iPhone should boot normally, display the Apple logo, and run iOS with no unexpected prompts.
For context, the Phone Tips Pro team notes that visual cues alone aren’t definitive, but they set a strong early signal. Always pair visual checks with identifier verification and official status checks. This multi-layer approach reduces the chance of being misled by convincing fakes.
Step 1: Inspect the physical box and accessories
Start with the box and contents. Look for consistent fonts, correct branding, and a model name that matches the device you’re holding. Inspect the charger, USB cable, and earbuds (if included) for branding quality and connector integrity. Counterfeit packaging often uses slightly altered logos or inferior plastic and metal finishes. If any accessory feels cheaply made or the USB-C/Lightning port doesn’t align, set the device aside for a deeper check.
- Confirm that the serial number on the box matches the device’s serial number.
- Check the regulatory markings and sticker alignment; misprints or misaligned labels are common on fakes.
- Keep the original purchase receipt or proof of sale if possible to validate authenticity later.
Tip: Take photos of the box and accessories from multiple angles for later comparison with official product pages.
Step 2: Locate and compare device identifiers in Settings
On the iPhone, go to Settings > General > About to find the model name, iPhone model, serial number, and IMEI/MEID. These numbers should be clean, without spaces or unusual characters. If any identifier is missing or appears cropped, this is a major red flag. Cross-check the serial number and IMEI with what’s printed on the box and the original receipt. If you can’t locate one or both identifiers, or if Settings reports inconsistent information, stop and investigate further.
- Note that on some carriers or devices, IMEI might be shown under SIM status.
- If you cannot access About due to Activation Lock issues, you’ll need to resolve that blockage before proceeding.
Phone Tips Pro cautions that altered identifiers or inconsistent data across sources strongly suggests a non-genuine device. Always verify against official sources before concluding authenticity.
Step 3: Verify activation status and Apple ID/warranty status
Activation status and Apple ID association are strong indicators of legitimacy. If the device is activated to a different Apple ID or shows an unexpected Activation Lock status, there may be security concerns or it could be stolen. Go to Settings and sign in with an Apple ID you know, then check Settings > General > About to confirm the device reports a valid iOS version and is eligible for activation. Use Apple’s official tools to confirm warranty coverage and service eligibility based on the serial number.
- If Activation Lock is enabled and you don’t recognize the Apple ID, do not force activation.
- Check that the device has an active warranty or support coverage through Apple’s system.
This cross-check helps avoid devices that might be reported stolen or locked to another account. It also confirms that the device is recognized by Apple’s activation systems.
Step 4: Validate warranty and service coverage with official tools
Apple’s official coverage checker provides a straightforward way to confirm whether a device is genuine based on its serial number. Visit the official check coverage page and input the serial number to view warranty status, eligibility for service, and coverage type. A genuine device typically shows valid warranty information consistent with the model and purchase date. If the system reports unknown or invalid data, it’s a strong sign the device could be non-genuine or tampered with.
- Keep a record of the results and compare with what you were told by the seller.
- If you find discrepancies, contact Apple Support and request a verification.
Using official tools helps avoid scams and ensures you’re not relying on third-party websites that may be unreliable. This step is crucial for peace of mind.
Step 5: Check hardware and software behavior for consistency
Run core apps and system features to assess hardware integrity and software legitimacy. Check the touchscreen responsiveness, camera performance, speakers, microphone, Face ID/Touch ID, and sensors. Fake devices often exhibit laggy performance, missing animations, or altered camera behavior. Ensure the device runs the expected iOS version, with regular security updates and app store access intact. If something feels off—unusual heat, rapid battery drain, or abnormal app behavior—pause use and seek professional help.
- Compare the device’s performance with a known genuine iPhone of the same model.
- Ensure there are no unusual third-party apps or settings that seem out of place.
Tip: A genuine iPhone will consistently update to current iOS releases, and critical security features should be active.
Step 6: Cross-check with official channels when in doubt
If uncertainties persist after the hands-on checks, use official channels to verify authenticity. Apple Support can guide you through steps to confirm model numbers, serials, and activation status. You can also seek help at Apple Stores or Authorized Service Providers. Document any mismatches and bring the device, box, and accessories for a thorough inspection. Honest sellers will support verification and provide verifiable proof of purchase.
- Bring the device and original purchase details to a store for hands-on validation.
- Ask for the device’s serial number and confirm it matches Apple’s database entries.
This final cross-check ensures you’re not relying solely on any one source and helps resolve edge cases that tests alone might miss.
Step 7: Special considerations for refurbished, grey-market, or counterfeit devices
Refurbished or grey-market devices can be genuine but may lack full documentation or official packaging. If you’re buying refurbished, request proof of refurbishment from the seller and verify the device is listed in Apple’s warranty database. Be cautious of extremely low prices that seem too good to be true. Counterfeit devices may mimic iPhone design but fail to pass basic identity checks. If you find red flags, insist on original receipts, serial numbers, and a test drive with Apple Support assistance before finalizing the purchase.
- Verify that the refurbisher is an authorized partner where possible.
- Ask for serial-number-based verification and official refurbishment documentation.
Remember: Even genuine refurbished devices should show consistent identifiers, warranty status, and activation data.
Step 8: Create a 10-minute verification flow you can repeat
Develop a quick, repeatable checklist you can run in under 10 minutes when evaluating a device. Start with a visual inspection, then Settings > About to pull identifiers, followed by Check Coverage and Activation Lock checks. Compare results across the box, invoice, and device data. If all checks align with Apple’s databases, you can be confident in genuineness. If any mismatch arises, stop and request further proof of purchase or seek in-person verification.
- Keep a simple record of the results for future reference.
- Use a consistent order to avoid missing critical checks.
This flow streamlines future verifications and reduces the chance of overlooking key identifiers.
Step 9: Next steps if concerns persist or you need assurance
If any red flags remain after all checks, do not use the device for sensitive data. Contact Apple Support, the seller, or the original retailer for a resolution. In worst-case scenarios, consider returning the device or pursuing a formal dispute. Document every communication and retain all receipts and screenshots of the checks you performed. For ongoing issues, consult a professional technician who can conduct a deeper hardware/firmware analysis to confirm authenticity.
- Do not unlock or jailbreak the device as a workaround.
- Use official channels for disputes and refunds rather than third-party services.
By following these steps, you protect yourself from costly mistakes and gain confidence in the device’s authenticity.
Real-world scenarios: refurb vs counterfeit and how to handle them
In the real world, you’ll encounter three common scenarios: a genuine refurbished device with full documentation, a counterfeit device that looks convincing but fails key identity checks, and a grey-market unit that requires careful verification of purchase provenance. Each case requires a slightly different approach: refurbished devices should come with refurbishment proof and remaining warranty, counterfeit devices will fail at least one official check, and grey-market devices demand thorough documentation and post-purchase support. Knowing how to distinguish these scenarios helps you act decisively and minimize risk.
- Keep receipts and serial numbers handy when negotiating purchases.
- When in doubt, walk away and seek a verified retailer.
- After a positive authenticity verification, keep records for future support needs.
This awareness reduces vulnerability to scams and ensures you maintain access to legitimate Apple support.
Final checklist you can run in under 10 minutes
- Visually inspect the box and accessories for quality and branding.
- Open Settings > General > About and record serial, IMEI, and model.
- Use Check Coverage to verify warranty status with the serial number.
- Confirm Activation Lock and Apple ID status.
- Test core hardware and software behaviors and look for inconsistencies.
- If any data mismatches appear, consult Apple Support before proceeding.
This rapid flow lets you validate genuineness efficiently and with confidence.
Tools & Materials
- iPhone unit(The device you’re validating)
- Original box and accessories(Charger, cable, EarPods if included; helps verify packaging integrity)
- Stable internet connection(Needed to access Apple servers and Check Coverage)
- Access to Settings(To view serial, IMEI/MEID, and model information)
- A secondary device or computer(Helpful for cross-checks or recording results)
- Proof of purchase (receipt or invoice)(Excellent corroborating document when possible)
Steps
Estimated time: 25-40 minutes
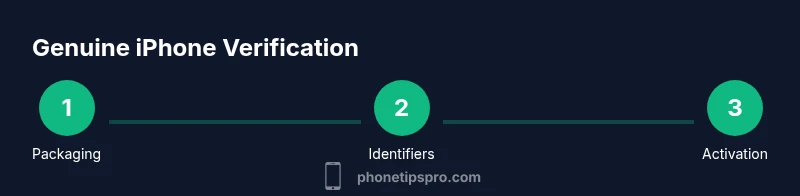
- 1
Inspect packaging and accessories
Start with the box and every accessory. Look for accurate branding, fonts, and alignment. Any misprint or damaged accessory warrants deeper verification.
Tip: Compare the model name on the box with the model you’re holding; mismatches are a common counterfeit cue. - 2
Open Settings and pull device identifiers
Navigate to Settings > General > About to record serial, IMEI/MEID, and model. Ensure these values are complete and readable. If any data is missing or garbled, halt and re-check.
Tip: Write down identifiers and cross-check against the box and invoice. - 3
Check activation status and Apple ID
Attempt a clean activation check by signing into a known Apple ID. Ensure Activation Lock is not blocking the setup unless you’re using a device you own. Activation issues can indicate non-genuine devices or stolen status.
Tip: If Activation Lock appears, request proof of purchase and original ownership. - 4
Verify warranty status with Check Coverage
Go to Apple’s Check Coverage, input the serial number, and confirm the warranty and service eligibility. A valid result supports authenticity; inconsistent results require further verification.
Tip: Keep a screenshot of the verification page for your records. - 5
Test core hardware and iOS integrity
Test the touchscreen, Face ID/Touch ID, speakers, cameras, and sensors. iOS should run smoothly with updated software and no abnormal behavior.
Tip: Watch for unusual lag or misbehavior that might signal tampering. - 6
Cross-check with an official source
If doubts persist, contact Apple Support or visit an Authorized Service Provider. Use on-record discussion to corroborate the device’s identity.
Tip: Always use official channels to avoid misinformation from third-party sites. - 7
Assess refurbished vs counterfeit risk
If refurbished, verify refurbishment documentation and seller reputation. Counterfeits often lack legitimate refurbishment records and proven provenance.
Tip: Request refurbishment certificates or serial-based verification from the seller. - 8
Create a 10-minute verification flow
Establish a fast routine you can repeat before every purchase or transfer. A consistent flow minimizes missed checks and reduces risk.
Tip: Practice once with a known genuine device to calibrate your expectations. - 9
Decide on next steps if red flags appear
If any identifiers mismatch or verification fails, stop using the device for sensitive tasks and pursue refunds or official verification.
Tip: Document all findings and request a return or exchange as needed.
FAQ
Can a counterfeit iPhone pass activation?
Often not. Activation screens and Apple ID checks can reveal counterfeit devices. If Activation Lock or unfamiliar Apple IDs appear, stop and verify with official sources.
No. Activation checks usually catch counterfeits; if you see an unexpected Apple ID or lock, consult official support.
How do I find the iPhone serial number and IMEI?
Go to Settings > General > About to view serial number and IMEI/MEID. You can also check the device original packaging for these identifiers.
Open Settings, tap General, then About to find serial and IMEI. Check against the box for consistency.
Is a refurbished iPhone always genuine?
Refurbished devices can be genuine if provided by authorized refurbishers and accompanied by documentation. Always verify refurbishment proof and remaining warranty.
Refurbished can be genuine, but confirm proof and warranty with Apple or the seller.
What should I do if identifiers don’t match?
Do not use the device for sensitive tasks. Ask for a replacement or refund and request official verification from Apple or the retailer.
If identifiers don’t match, stop using the device and seek a replacement with official verification.
Can Check Coverage prove authenticity?
Check Coverage helps verify warranty status by serial number, which supports authenticity. If the data don’t align, seek official assistance.
Yes, it helps verify authenticity by warranty data; if it doesn’t align, contact support.
What about using third-party sites for verification?
Avoid relying solely on third-party sites; use Apple’s official tools and retailer receipts for accurate verification.
Stick to official tools and receipts rather than third-party sites.
Watch Video
Quick Summary
- Verify identifiers in Settings against packaging.
- Use official Apple tools to confirm warranty and activation.
- If any data mismatches, pause and seek official support.